The trend of working remotely is becoming the norm, meaning how we capture video content is adapting to include other options.
A full-blown, in-person production with a professional crew, lighting, audio, makeup, wardrobe – you get the idea – will always produce the highest quality results.
However, there are plenty of ways to capture content – like partner stories, case studies, leadership spotlights, and presentations – from the comfort of your home or office with readily-available equipment like the webcam on a computer.
There is more to it than simply hitting record, though.
This article will walk you through 5 steps to recording a high-quality video to make sure you’re putting your best foot (and face) forward.
1. Setting up Your Home Video Equipment
The first step to capturing a video on your computer is making sure you have the required software and audio/video equipment. This includes a webcam, whether it’s a built-in feature or an external camera that mounts onto your monitor.
In general, if you can, use an external and high-quality webcam and microphone. While the built-in ones can get the job done, a higher quality device is always recommended. The average webcam is 720p. If you want a better picture, make sure your webcam is at least 1080p.
External Webcam
Here are 3 external webcam options we recommend:
This is the best option if you need to record from a wider angle since the camera has a 90-degree field of view.
This is the best option for most people as it’s easy to use, has a 78-degree field of view, a glass lens, and 2 omni-directional microphones.
This is an expensive option but will produce the highest quality video due to its 4k image sensor, HD 5X zoom, automatic adjustments, and more.
Software to Record Videos
From there, you’ll need the software required to record from your webcam. There are plenty of ways to do this, including but not limited to:
OpenReel is a remote capture platform that allows you to record high-quality video natively through a web browser on a computer or a phone app. VMG Studios now utilizes this platform for our remote video productions as we believe it offers the most features and produces the highest-quality product.
Camtasia is a screen recording and video editing software that’s compatible on Windows and Mac. Camtasia, which is a TechSmith product, offers a free 30-day trial. There are individual, business, education and non-profit pricing options available.
OBS is a free and open-source software for video recording and live streaming on Windows, Mac or Linux.
This application only applies to Mac users. It has 3 different options for recording: Movie, Audio, and Screen. If you’re looking to film yourself on-camera, you’ll want to do a Movie recording which utilizes your webcam. A screen recording will capture the content on your computer monitor.
If you are not able or allowed to download and install third-party applications, check with your IT department for the recommended application/method.
Once you have your recording software installed, make sure you’re configuring your computer and webcam appropriately.
- Check your audio and camera inputs to make sure you’re using the correct ones/grant permission for your application of choice to access the computer’s camera and microphone.
- Turn off system notifications or any other computer sounds or pop-ups, like the ping you hear when a new email hits your inbox, that might play or display.
- If you are doing a screen recording, clean up your desktop. A messy or busy desktop could distract from what you’re trying to show on-screen.
READ: OpenReel Remote Capture: Definition & Benefits for Video Production
2. Recording Audio for Your Video
How a person looks on-camera is important, but how they sound is just as, if not, more important. Bad audio (muffled, scratchy, quiet) can lower the quality of a video.
The internal microphone of your computer captures decent audio, but if you’re looking for a higher quality sound, you’ll want to record on another device.
Here are two options we recommend:
Features include gain control, mute button, and zero-latency headphone output.
Includes a sound card that is compatible on a PC or MAC and a built-in headphone jack so you can listen to yourself in real-time.
Try to avoid recording where ambient noise is loud, such as the front room of your home or office that’s close to a busy road or next to the laundry room when the dryer is running. Pick somewhere quiet with little to no bounce in the room.
If you’re recording outside for some reason, stay out of the wind as much as possible.
3. Location and Placement of Your Home Video Shoot
Once you have your software ready to go, you’ll need to find a good place to record. Where you record your video can make a big difference in professionalism.
You’ll want to find a clean, uncluttered, and pleasing background to not distract from the subject in the video. Examples of good backgrounds, in either an office space or your home, include:
- A solid wall at an angle. Anything that’s in company brand colors is a bonus. Brick also looks great on-camera.
- An elegant lobby or lounge space.
- Larger spaces or rooms with soft textured décor, like throw pillows and blankets, help prevent echo, so try to avoid really small and stark spaces.


Once you find a good background, you’ll need to place your computer accordingly and at an appropriate distance. In general, the computer should be about two to three feet away from the subject. The subject should be close enough for the microphone to pick up their voice but far enough away that their face isn’t an overwhelming presence in the picture frame.
The camera lens should also be at eye level, so if the webcam is on top of the computer, be sure to prop the screen up to meet your eyes.
Rule of Thirds
The rule of thirds is a good one to follow for proper computer placement: mid-abdomen to mid-chest and up (never just from the neck up).
- Presentation to camera rule of thirds
This is probably how you picture recording yourself on-camera: framed center and looking directly at the screen. It’s a conversational, talking-head style video many of us are familiar with thanks to video chats, vlogs, webinars, etc.
The host is looking into the camera from the center of the screen, body is aligned to the center, and the eyes are on the upper third line.

Image credit: AirCall
Use this framing if you are presenting. This style is also recommended if the video will be used on social media/if you need to export a square version.
- Off-center presentation rule of thirds
This style is similar to an interview-based recording where you’ll leave space to one side of the screen, however, you’ll look into camera instead of off-camera. Your body will be aligned to the right third line, face is on the upper third line, and the headroom is minimal.
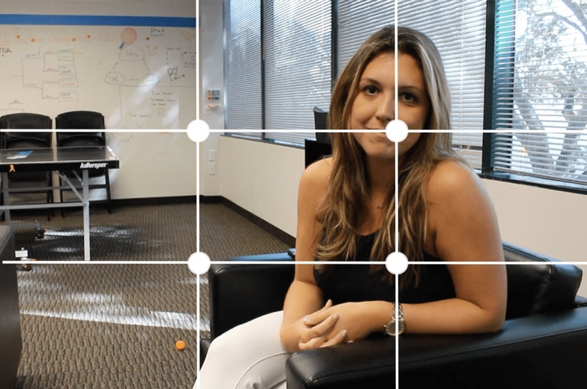
Image credit: Blueleadz
Use this framing for a more casual and inviting shot, or if you want to have space for graphics to be inserted on-screen with you.
- Interview-style rule of thirds
Interviewee is looking off-camera in the opposite direction of where he/she is seated on-screen. Eyes are on the upper third line, while the body is on the left third line.
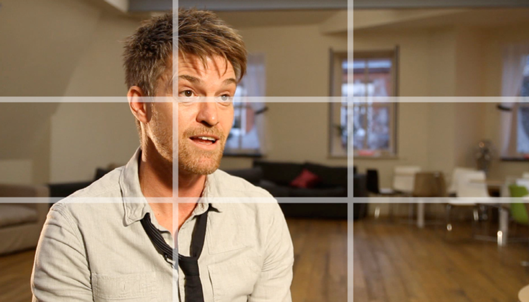
Image credit: Video Know How UK
Only use this framing if you are doing an interview-style. It gives the appearance that the subject is talking to someone off-camera (even if there isn’t anyone there).
If you’re recording like this, and there’s no actual person to talk to, find a spot in the room that’s at eye-level and make that your focus point so your eyes don’t wander.
4. Lighting Your Home Video
This is where things can get a little tricky since you might not have professional lighting equipment on-hand, but lighting is extremely important when it comes to the quality of your video.
Here are some tips on how to best light your video when recording from home.
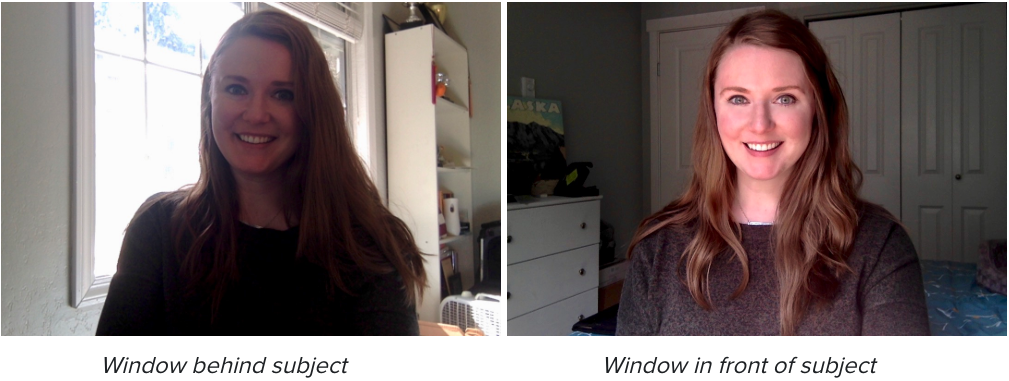
- Natural light
This is the next best thing besides a professional lighting set-up. Find a window that brings in the most natural light throughout the day. It is most pleasing if this is splashing on your face at a 45-degree angle.
- Avoid backlight
This is any light that is shining on you from behind. It can cause you to silhouette. Natural lighting is the best, but do not shoot yourself with the window (or sun) behind you.
- Ring light
This is a simple lighting tool that you can easily set-up anywhere. It helps reduce shadows on the subject’s face and you can adjust the color temperature. Here are some that we recommend:
-
- Ring Light Pixel 19-Inch Pro
This includes a light stand, 3 color filters, wireless remote, Bluetooth selfie remote, and a phone carrier. - Pixel 19-Inch Bi-Color Ring Light
This includes a light stand, white filter, wireless remote, Bluetooth selfie remote, and a phone holder. - Inkeltech Ring Light
18-inch LED ring light kit with a stand. Includes a remote control, selfie control, phone holder, and camera holder. - LED 6-Inch Ring Light
This is a smaller version and comes with a tripod stand, a cell phone holder, and 3 light modes.
- Ring Light Pixel 19-Inch Pro
- Neutral or slightly warm light
If you can’t get good access to natural light, this is a good option. Overhead lighting is not ideal as it can cast odd shadows and be sure to avoid fluorescent lights if at all possible.
5. Preparing and Shooting the Video on Your Computer
Once everything is in place, you’ll next want to make sure you are camera ready. Dress to make an impact. Think about your target audience and the message you want to convey, and dress appropriately.
Once you’re ready to say action, there are a few more things to keep in mind to ensure your on-camera performance goes off without a hitch.
- Do not touch the laptop or table it is sitting on
This will jostle the camera and make the video shaky
- Make eye contact with the webcam.
It’s easy to flick your eyes down to your own image or to your script but try to keep your eyeline on the camera itself.
- Give lead-time
If you’re recording with another person(s), be sure that you aren’t talking over anyone else in the recording. For example, if you’re the interviewee, once you’ve been asked a question, wait a couple of seconds before answering. This ensures the interviewer is finished talking.
- Speak clearly and slowly
It’s easy to get nervous and start speaking too quickly, which can lead to stumbling over your words. Slow it down.
- Record multiple takes
As long as it’s not a live-streaming event, it’s okay to record a second or third take if you stumble over a line. Just make sure you backtrack a bit so it can be seamlessly edited in post-production.
- Be careful reading your script
If you can, try to memorize as much as your script as possible to avoid reading your script on your screen while recording. Why? Because the audience will see your eyes moving since you’ll no longer be making eye contact through the camera.
- Practice, practice, practice
This is simple. Practice your script ahead of time and try to memorize it as much as possible. You’ll feel more comfortable and natural the more you practice.
CLICK HERE TO READ 10 TIPS FOR BECOMING COMFORTABLE ON CAMERA
Wrapping Up Your Video
When you’re done recording your video, make sure you save your project or file right away. The last thing you want is to lose all your hard work.
After you save your work, you’ll next want to send your assets to your editor or video partner. A video partner, like us here at VMG Studios, would walk you through how to export the highest quality video for editing.
For example, if you’re using Camtasia, send the raw file which is a .TREC. If you’re using QuickTime, OBS, or any other application, send the file type that you chose to record/encode to or the whole project file.
Recording Your Own Video From Home
It may seem daunting to record your own video, at first, but the more you do it, the more comfortable you’ll become. Set yourself up for success from the get-go with a solid webcam and microphone, and then find a spot in your home or office with a clean background and natural lighting.
While there may be some creative limitations to recording yourself on a computer, there are still several ways to jazz up your video in post-production with supporting graphics, music, sound effects, etc. If you don’t have the capabilities to do this yourself, a video production partner will surely fill the void.
Utilizing the techniques and technologies listed in this article ensures you can capture video content anywhere, anytime.
Get organized and record video from your computer by clicking the image below to download a free checklist