
Voice in video is always important. Whether it’s explaining how your product can help a potential customer, or elevating your message to cinematic heights, the goal is the same: impactful, clear, and well-balanced.
We want the best parts of the voice to come forward while de-emphasizing noise, errant frequencies, and volume discrepancies that might make it hard to hear what’s being said. This article will give you an overview of the basic tools you can use to make your voice-over and dialogue sound better, as well as helpful tips on how to clean it up in post-production.
Part 1: Capturing the Voice
The first step in good dialogue is how you capture the voice and includes:
- Microphone selection
- Attention to the recording environment
- Microphone placement
All three of these are incredibly important, so let’s dive into some tips for capturing good audio in a controlled environment, like your house, conference room, or the like.
Microphone Selection for a Voice-over
Microphone selection is the first step. Microphones come in 2 main flavors: condensers and dynamic.
Dynamic microphones, like the rugged and timeless Shure SM-58, are great for stage use but aren’t as sensitive as condensers.
Condenser microphones have a lower mass diaphragm, or “thing that captures the sound and turns it into electronic signals,” and are therefore better at following the changes that are fed to them. This means more clarity and responsiveness, but it also means they require external power.
The audio engineering industry figured this out a long time ago and worked a power standard into the microphone connector that can be enabled from most audio interfaces you would be recording into. This is called “phantom power.”
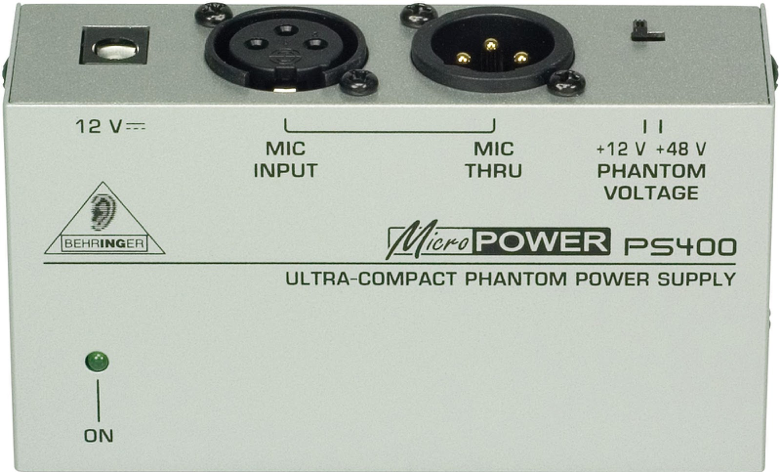
An example of a dedicated phantom power unit
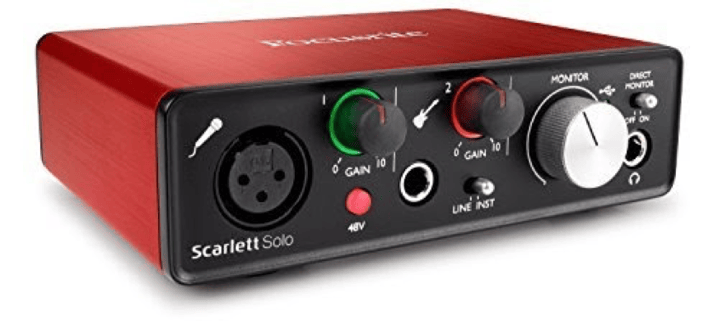
A Focusrite Scarlett 2i2 with phantom power engaged (the 48v button)
There are always exceptions to the “condensers are better than dynamic-microphones” rule for studio applications. A cheap condenser will be outperformed by a well-engineered dynamic microphone.
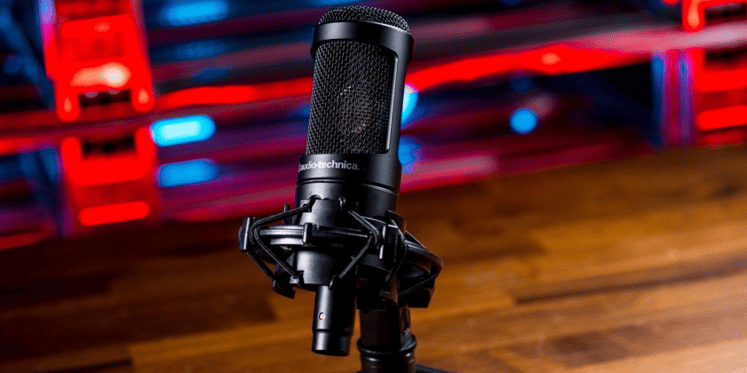
At home I have two Audio Technica AT2035 condenser microphones that I love. They were under $200 a piece, and I use them for VO (voice-over) and singing.
You may be tempted by using a USB condenser, like the Blue Yeti or RØDE NT-USB. That’s because this gives you a condenser microphone response without having to splurge on an audio interface that supplies phantom power. The quality of these microphones is debatable, but there’s no denying their ease of use. Of the current options, I would go for the RØDE as they have a long history of making quality microphones. We even have one in our vocal booth at VMG Studios!
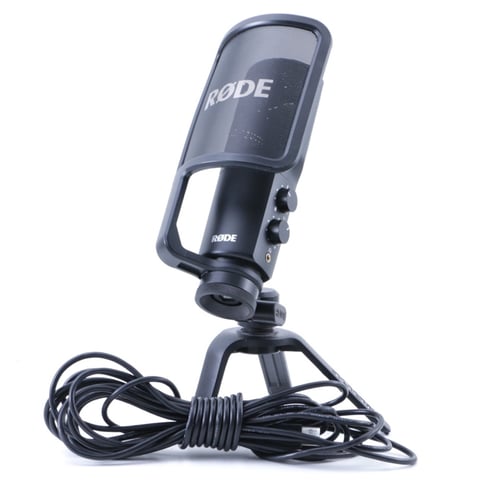
The RØDE NT-USB. Source
Where You Record Your Voice-over
Now that we’ve gotten a microphone and plugged it into our computer, it’s time to think about where you’re recording.
Close your eyes and listen to your room. What do you hear? Maybe you hear traffic outside. Maybe you hear murmuring from another room. Is there an air conditioning unit or hum from any devices in the room?
All of these will end up in your recording.
Do your best to turn off any devices adding ambient noise, check the floor if you’re standing, close doors to other rooms, and if all else fails, move rooms if there are too many distracting sounds.
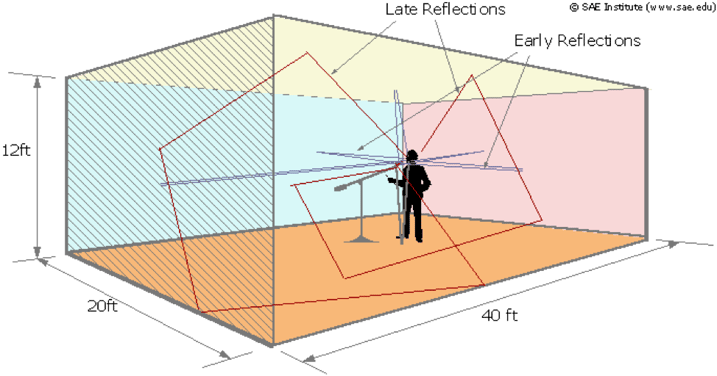
An example of how a voice can reflect around a room. Source
Now clap your hands. Do you hear any flutters or echoes? When you talk, can you hear your voice reverberating at all in the space? If you can, your microphone can too, and these reflections can degrade the quality of the recording. Try to find a space that’s as reflection-free as possible.
READ: BENEFITS OF A PROFESSIONAL VOICE-OVER
Voice-over Microphone Placement
Once you have your microphone and a quiet place to record, you’ll need to place your microphone. But before we dive into that, let’s first talk about plosives.
Plosives are natural bursts of high-volume sounds that the human voice makes when using certain letters of the alphabet in natural space. Words with hard p, t, or k sounds will spike a recording and cause clipping, otherwise known as “bad ugly sound.”
To help combat plosives, we can put what’s called a “pop screen” between us and the microphone. These come in a bewildering array of sizes, shapes, and prices, so don’t worry too much about which one you use, just be sure to use one.
Attach it to your microphone stand or mount and position the filter a few inches away from the microphone capsule.

A vocalist in a studio with a microphone. Source
Now, get that microphone close to your mouth (but not too close, unless you’re going for an autonomous sensory meridian response or ASMR). Also keep in mind that the closer you get to the microphone, the more bass it will pick up (this is called the proximity effect).
Next you’ll want to test for levels. Give yourself enough headroom in your recording to avoid clipping, which is a form of waveform distortion. Read through the loudest part of your material (the highest energy part) to get a reference level and then set your input to give yourself around 6 dB of headroom (the difference between the loudest signal and clipping).
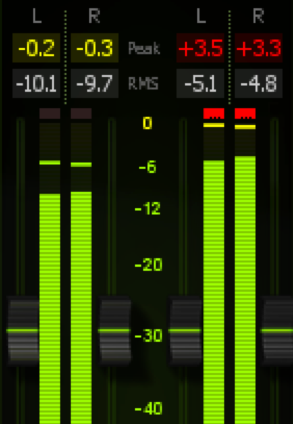
On the left, a meter showing peaks at -.02/.03 dB. On the right the meters are clipping at +3.5/3.3 dB.
Once you’ve set levels and are feeling comfortable, hydrated, and relaxed, record your VO!
Part 2: Post-Processing Your Voice-over
Phew, that was a pretty big first step, but it’s important to get the best quality going into the recording as you can. We can work some magic in post-production, but there are limits.
Most digital audio workstation software and video editing software have a place where you can add audio plugins to a chain and process your voice with built-in tools. I use Adobe Audition for audio editing and processing.
The basic ingredients for VO in post-production are:
- Noise Reduction: if necessary
- Equalization (EQ): cutting and boosting certain frequencies
- Noise gate: volume processing that cuts out noise below a certain threshold
- De-Essing: a frequency-dependent dynamics processor that is meant to tame “ess” sounds
- Compression: smoothing out the volume levels to create an even listening experience
- Limiting: for catching peaks when we make up volume from the compressor
As mentioned, editing software will have some built-in tools for these things, but their implementation might be rudimentary.
For VO I like to use a plugin called iZotope Nectar, which I’ll be referencing throughout this next section, however you should be able to reproduce these tips in built-in software in programs like Final Cut X or Adobe Premiere.
If your vocal was recorded in an environment with unwanted noise, we’ll check in with noise-reduction first.
Noise Reduction
In a perfect world, all of our voice-over would be recorded in a professional booth with a top-notch microphone, or in a professional studio with no errant noises. But not all of us have access to those kinds of things, so sometimes unwanted noises will sneak into our recordings.
If you have too much background noise, like a hiss or hum or a fan blowing air, some light noise reduction can help.
Hum in a recording is generally caused by ungrounded electrical systems and resides in the 50 to 60 Hz range. This will be a consistent signal and can be addressed with an EQ (we’ll get to that in a bit) or a dedicated hum removal plugin. Adobe Audition and Final Cut Pro X both have tools for this.
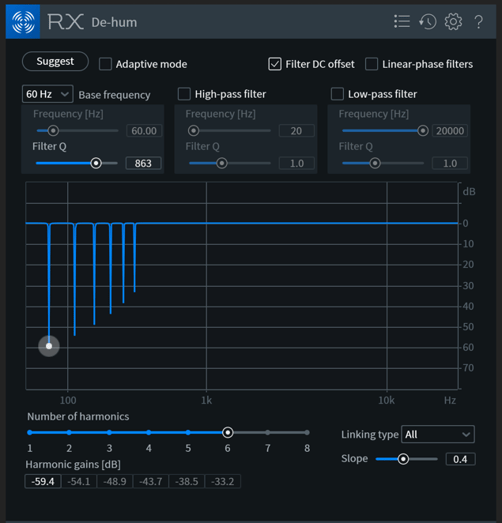
iZotope RX7 De-hum removing 60 Hz hum and its harmonics
Noise reduction will help tackle the rest. The aforementioned software has tools for this too, some automatic, and some that try to learn what the noise is and then target it.
If your tool is of the automatic variety, apply it first in your effects chain and adjust the threshold and reduction to taste. Too much reduction will introduce artifacts, a noticeable and often accidental distortion, into your main signal, so make sure to keep an ear out for any “swimmy” sounds in your voice as you apply the processor. Remember that the noise is in the voice too, and you can’t just make frequencies disappear from only one part of the recording.
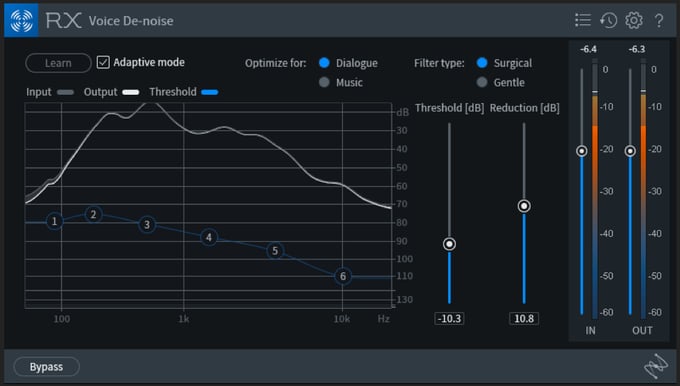
iZotope RX7 Voice De-noise in automatic mode
If your noise reduction plugin gives you the ability to capture a noise print, select a portion of the recording that’s only background noise and turn on the “learn” or “capture” function of the plugin. Once it’s captured the noise print, adjust the threshold and reduction to taste. You’ll still need to keep an ear out for artifacting, so don’t go too crazy with the reduction.
Equalization (EQ)
An EQ is a filter that lets you boost and cut certain frequencies in your sound. The human voice has some inherent qualities to it we’re going to take into account, as well as cleaning up unnecessary sounds that may be in the room.
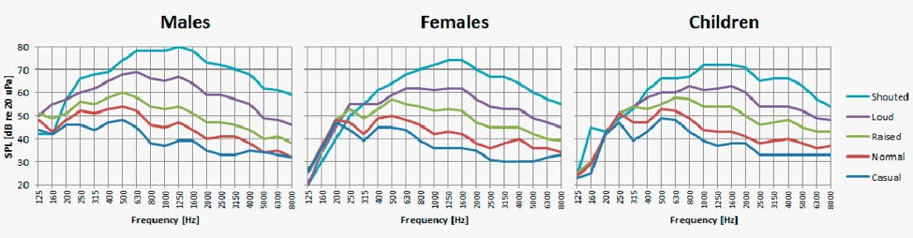
https://www.dpamicrophones.com/mic-university/facts-about-speech-intelligibility
If you’ve never used an EQ before, don’t worry. There’s a really easy way to start using one to improve the quality of the vocals.
The first thing I like to do is grab the lowest frequency control and set it to what’s called “highpass” mode. This means it acts as a shelf that drastically attenuates everything below the frequency it’s set at.
We really don’t need anything much below 100 Hz for the vocal to work, so we’re going to set the highpass there. The added bonus is that this basically obliterates any rumble that you might have accidentally picked up while recording.
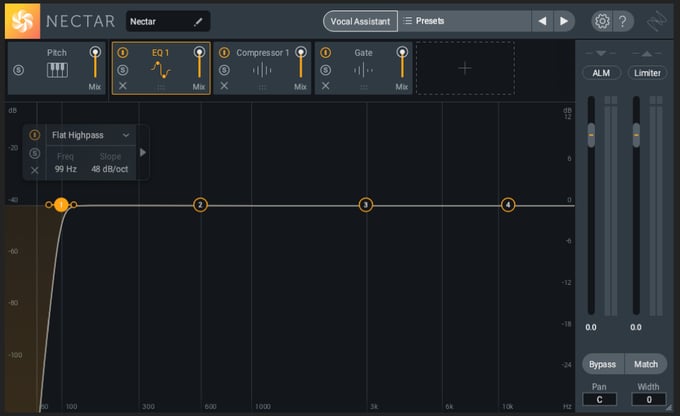
Applying the highpass filter in iZotope Nectar 3
The next thing I like to do is introduce a small, graceful dip in frequencies around 400 Hz. This is to cut down on mud or boominess in the recording. You may not need this, but it’s worth trying out if your VO is sounding a little too “thick.”
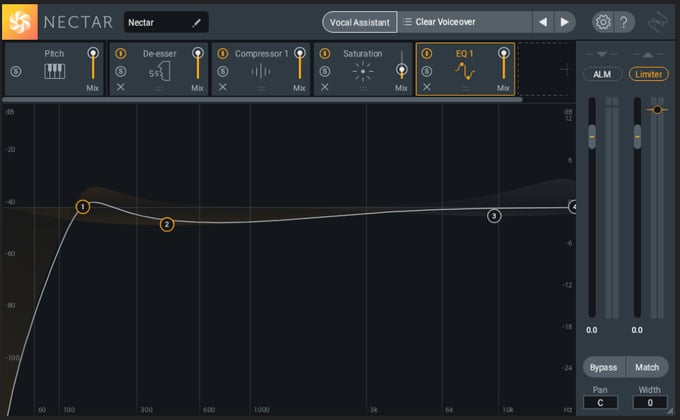
Applying a low-mid dip in iZotope Nectar 3
Between 2-4 kHz is where most of the intelligibility of vocals come from, as consonance are mostly present there. We have to be careful here because a small cut or boost can make a big difference, either clearing out harshness or making our ears hurt. Try a small dip or bump in this section and see how it sounds to your ears.
Finally, we have the frequencies above 8k. These are where the “sparkle” and “air” of the recording can be accentuated. Or not. If you have a particularly noisy recording, you may need to cut here. If your microphone has a lot of high-end presence to it, you may not need to do anything. But it’s always worth trying a gentle boost here to see if you can bring out any magic that might be hiding in that range.
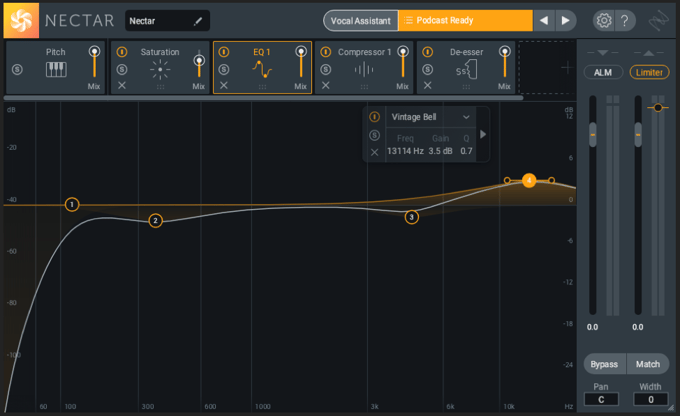
A 4k dip and 10k boost applied in iZotope Nectar 3
After playing with these 4 frequency bands to get a pleasing sound, you may choose to add one more band and do a sweep through the remaining frequencies, up and down, to see if there’s anything worth cutting or boosting. Just remember, you generally don’t need to go crazy with cuts or boosts and cutting is generally better than boosting.
Noise Gate
Noise gates can be useful, but you have to be careful with them. A noise gate, or just “gate,” is a processor that turns down the volume of an audio signal when that signal passes below a certain threshold.
You generally have control over the volume the gate opens and closes at, the amount of dB to turn down the signal, and the amount of time it takes for the gate to open and close.
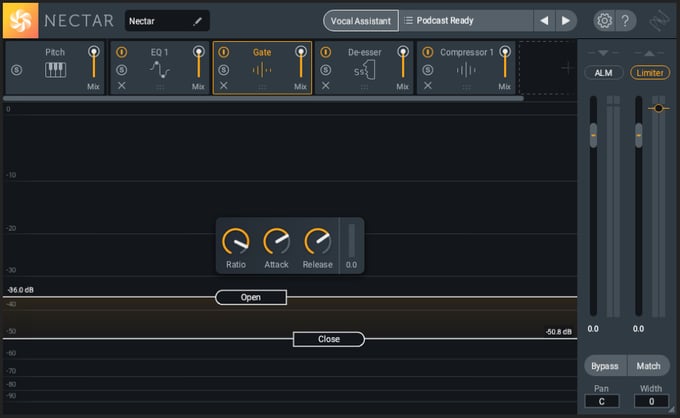
An example of a noise gate
On paper, this sounds like a great solution to fix a noisy recording, and if you don’t have a noise reduction processor, you can use a gate in that manner. But the tricky thing with that is you will never be able to get the background noise out of the recording when the gate is open. You’ll still hear the noise when the person is talking, and when it dips after the gate closes, it will sound extremely unnatural.
I would reach for a gate to help tame noise if I didn’t have another option, and I would use it sparingly. I wouldn’t have the gate drop the volume to zero when the voice isn’t present but reduce it so that it’s less audible.
De-esser
We used the pop filter to help with plosives, and now we’re going to tackle sibilance, the other black sheep of the voice recording world.
A de-esser listens to a specific frequency range and clamps down when a certain level is attained in that range.
“Esses” and “Shhhs” are a natural part of the human voice, but they can be over-pronounced by microphones and take up valuable headroom (volume) that we need to make the voice big and robust. So, we’re going to tame them.
A de-esser usually has two controls: one to set the frequency of the processor and one to set the threshold, or when the processor kicks in.
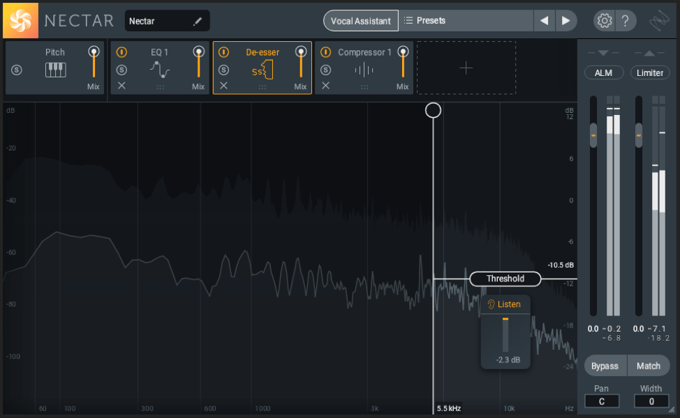
A De-esser in action
Sibilance, the kind of sound we’re trying to tame, lives up in the range of 2-10 kHz. Find a passage of your VO that includes these sounds and reduce the threshold of the de-esser until you see about -4 dD of reduction. Then adjust the frequency until you see the most response from the de-esser.
Some de-essers have the ability to solo the section of sound it’s listening to, which can be useful to hear what it’s doing. Adjust the threshold to taste, so that sibilance sounds natural but not overbearing.
Compression
The last steps have been about shaping the frequencies of our sound, and now we’re going to shape the overall volume of the sound with compression.
A compressor is a tool that looks at a particular volume level (set by the threshold) and reduces everything above that threshold by a certain amount (set by the ratio). You also set the attack (how long it takes the compressor to kick in when the threshold is reached) and release (how long it takes for the compressor to stop reducing after the signal drops below the threshold) of the processor.
Differences in volume when speaking are natural, and we don’t want to obliterate them completely, but we do want to tame some of those peaks so the voice sounds even. This gives us the ability to boost the overall volume of the dialogue so that we can get a fuller, more upfront sound.
Different genres of dialogue will call for different amounts of compression, but a good place to start is setting the threshold and ratio to get about -4 dB of effect. Lower the threshold and increase the ratio until the compressor starts to kick in, listening carefully. You’ll start to see the compressor reducing those peaks by a certain amount. If the differences in volume of your dialogue are really high, you may need to do a little volume automation before the compressor, but if not, find a combination of threshold and ratio that compliments your sound.
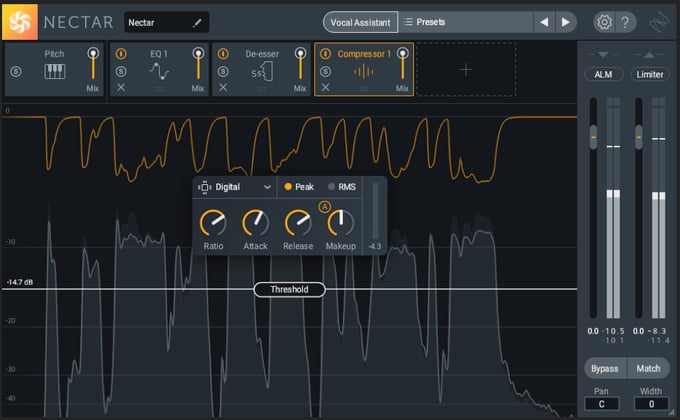
A Compressor in action
While you’re doing this, keep in mind a few things:
- Compression reduces the overall dynamic range of your sound. Don’t overdo it.
- Because you’re lowering the higher volumes, you’ll be able to (and want to) boost the overall volume of the dialogue track afterwards.
- Boosting the dialogue after taming the peaks will raise the noise floor, so compression can make noise worse.
- Keep your attack and release away from 0, especially at higher ratios, as this will sound extremely unnatural.
Limiting
A limiter is like a compressor, in that it reduces volume above a certain amount, but it’s more like a brick wall than a soft slope. Its ratio is set to 100 and will one-for-one reduce any volume that goes above its threshold. This is useful for catching peaks that would otherwise clip when you raise the volume of your signal after the compression.
Most editing software and audio software will have a built-in limiting plugin you can apply at the end of your chain. I’m using the one built into iZotope Nectar 3.
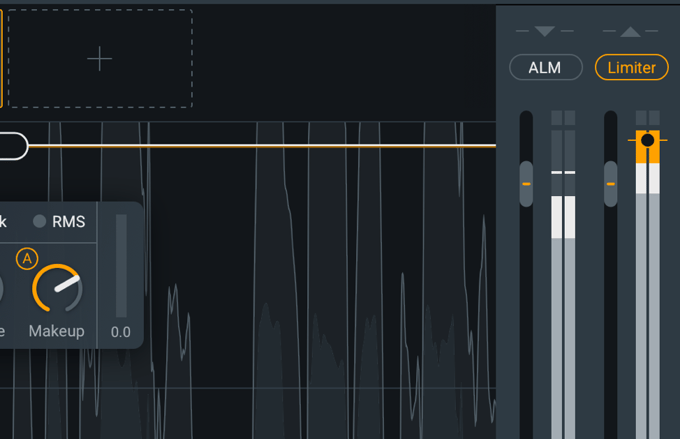
The makeup gain section of the compressor and final limiter of iZotope Nectar 3
Limiters have a threshold control, like a compressor. You’ll want to set this to -1 dB.
Now you can increase the output volume of your compressor without fear of peaks that clip. I like my dialogue to hit around -13 LUFS.
Recording Your Own Voice-over
We’ve covered a lot here, and it may seem intimidating to get started capturing and processing dialogue if you don’t have a lot of experience with the tools. That’s ok! We’re always learning here at VMG too, finding new and innovative ways to make your videos look and sound great.
Practice makes perfect, so don’t be afraid to experiment with different techniques until you’re happy with the results.
To learn about how to record high-quality video from your home computer, click the image below for a free checklist